Save
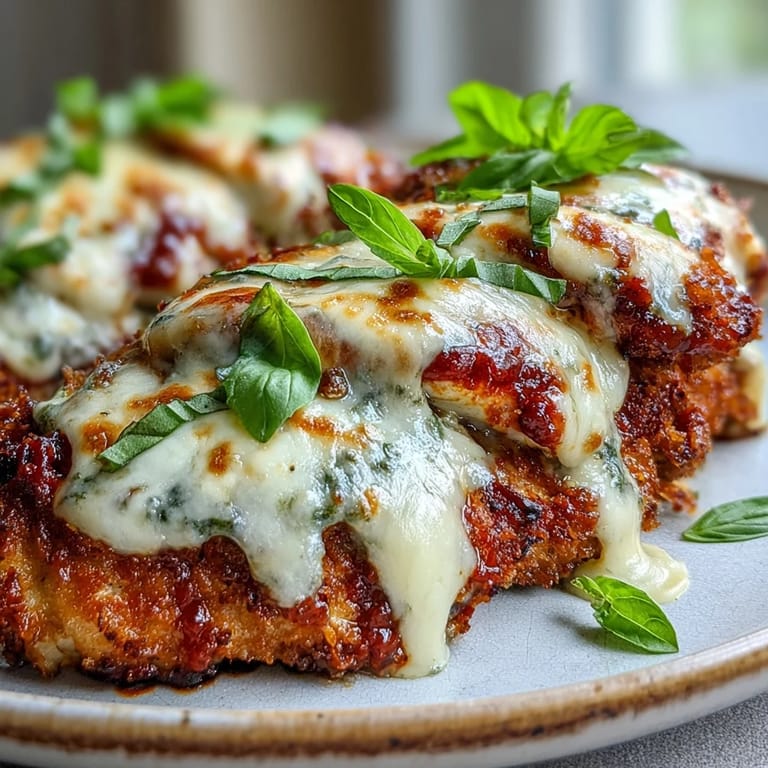
Save There's something about the sizzle of chicken hitting hot oil that still catches me off guard, even after making this dish a dozen times. My neighbor brought over a container of homemade pesto one summer evening, and I had chicken breasts thawing and a jar of marinara already open, so I improvised. What emerged from the oven was golden, bubbling, and so good that I've been chasing that first bite ever since. Now it's become my go-to when I want something that tastes like I spent hours cooking but actually came together while I was still in my apron.
I made this for my parents last spring when they visited, and my dad—who's skeptical about anything that deviates from his childhood recipes—asked for seconds. My mom kept telling him to slow down and taste it, but there was something about the combination of that fresh pesto underneath the melted cheese that just worked. That meal turned into a conversation about how sometimes the best food comes from happy accidents and willingness to play around in the kitchen.
Ingredients
- Boneless, skinless chicken breasts: Get the ones that are relatively similar in thickness so they cook evenly, or you'll end up with overdone edges and an undercooked center.
- All-purpose flour: This creates the base layer that helps the egg stick and keeps everything from sliding around during breading.
- Eggs: Two large ones give you enough coating without being wasteful, and room temperature eggs incorporate better than cold ones straight from the fridge.
- Italian breadcrumbs: They already have some seasoning built in, which saves you a step and adds flavor, but regular panko works beautifully too if that's what you have.
- Olive oil: Use just enough to create a golden crust without deep frying, which would make the whole thing feel heavier than it needs to be.
- Basil pesto: Whether store-bought or made from scratch, this is where the personality comes in—choose one you'd actually eat on its own.
- Marinara sauce: A good jarred marinara is perfectly honest work here; no shame in skipping the three-hour simmer.
- Mozzarella cheese, shredded: Shred your own if you have time because it melts more smoothly, but pre-shredded works when life is busy.
- Parmesan cheese, grated: The sharpness cuts through all that richness and keeps the dish from becoming one-note.
- Fresh basil leaves: A small handful scattered on top right before serving tastes like a finishing touch that actually matters.
Tired of Takeout? 🥡
Get 10 meals you can make faster than delivery arrives. Seriously.
One email. No spam. Unsubscribe anytime.
Instructions
- Get your oven ready:
- Preheat to 375°F while you're prepping everything else so the heat is there when you need it.
- Even out your chicken:
- Place each breast between two pieces of plastic wrap and pound it with a mallet until it's roughly the same thickness throughout—about half an inch is perfect. Season generously with salt and pepper on both sides.
- Build your breading station:
- Line up three shallow dishes: flour in one, beaten eggs in another, and breadcrumbs in the third. This setup makes the actual breading feel less messy and more like you know what you're doing.
- Coat each piece:
- Dredge the chicken in flour first, tap off the excess, then dip it in egg, and finally press it into breadcrumbs so they really stick. The key is not being shy about it—you want a proper, visible crust.
- Get your skillet going:
- Heat olive oil over medium-high heat until it shimmers slightly, then lay in your breaded chicken. You'll hear it sizzle immediately, which is exactly right. Cook for three to four minutes per side until the outside turns that deep golden brown you're after, understanding that the inside isn't fully cooked yet.
- Transfer to the baking dish:
- Move your golden chicken pieces into a baking dish in a single layer, leaving a little space between each one so they're not crowded.
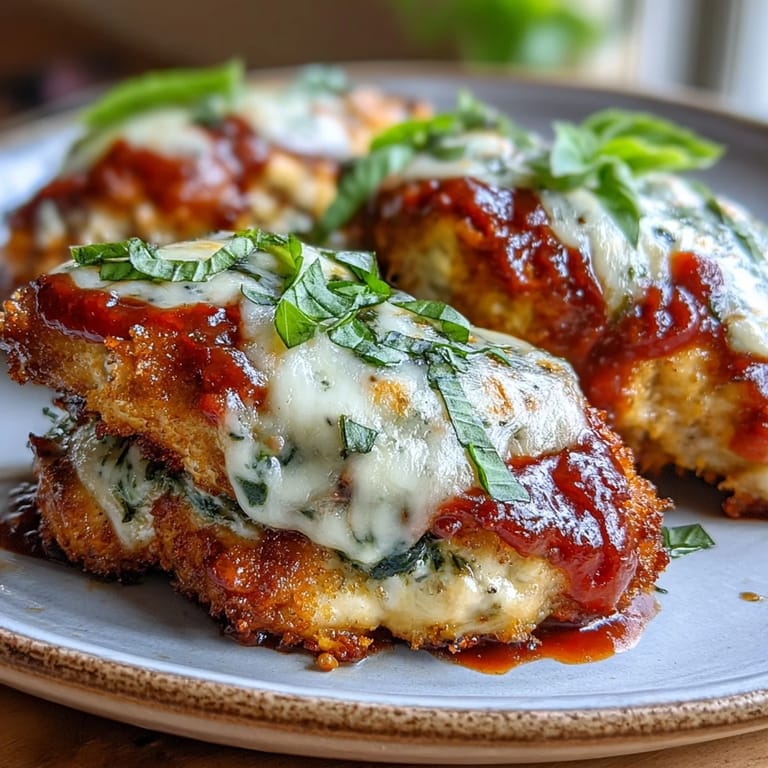
- Add the green:
- Spread about a tablespoon or two of pesto directly onto each chicken breast, letting it pool slightly in the valleys of the breading.
- Sauce it:
- Spoon marinara sauce over the pesto, not too heavy, just enough that you can see it peeking through. You're layering, not drowning.
- Cheese time:
- Sprinkle mozzarella first, then finish with Parmesan. The combination of both cheeses is what makes this sing instead of just tasting like a good casserole.
- Into the oven:
- Bake for fifteen to twenty minutes until the cheese is bubbling at the edges and the internal temperature of the thickest piece of chicken hits 165°F. If your oven runs hot, check around the fifteen-minute mark.
- Garnish and serve:
- Pull it out, scatter fresh basil over the top if you have it, and serve while everything is still warm and the cheese is at its most glorious.
 Save
Save The best part happens when someone who usually picks at their food gets quiet for a moment after taking a bite, that small pause where you know something just worked. I watch people find the pesto layer underneath and suddenly they're having a completely different experience than they expected, and that's become the real reward of making this dish.
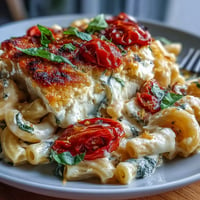
What to Serve Alongside
Pasta is the obvious choice and for good reason—a simple aglio e olio or buttered noodles catch the cheese and sauce that inevitably pools at the bottom of the pan. Garlic bread is never wrong, and a crisp salad with sharp vinaigrette balances all that richness so you don't feel weighed down after eating. I've also served this over cauliflower rice when I wanted something lighter, and it was genuinely good, though the pasta version is what makes me happiest.
Making It Your Own
The structure here is forgiving enough that you can play around without breaking anything. I've used sun-dried tomato pesto when basil felt boring, added a layer of ricotta under the mozzarella when I wanted extra creaminess, and even breaded the chicken with panko mixed with grated Parmesan for a sharper crust. The beauty of this dish is that once you understand how it works—chicken, crust, pesto, sauce, cheese—you can make decisions based on what's in your kitchen or what sounds good that day.
Storage and Leftovers
Leftovers actually improve after sitting a day or two in the fridge because the flavors have time to get to know each other. Reheat in a 350°F oven for about ten minutes covered with foil so the cheese doesn't brown any further, and it comes back to life better than most leftover dinners. I've also sliced cold pieces and tucked them into a sandwich the next day, which isn't exactly traditional but is surprisingly delicious when you're looking for lunch.
- Store in an airtight container and it keeps for three days, though anything beyond that and you should probably freeze it.
- You can actually freeze assembled pieces before baking, then add about five extra minutes to the oven time when cooking from frozen.
- If you're meal prepping, make the components separately and assemble just before baking so the breadcrumbs stay crispy.
 Save
Save This dish has quietly become the one I reach for when I want to feel competent in the kitchen without spending all evening there. It's the kind of meal that tastes like you tried but doesn't ask for your whole day.
Recipe FAQs
- → What makes this different from traditional chicken parmesan?
The addition of fresh basil pesto between the breading and marinara adds an extra layer of herbal flavor and richness that traditional versions don't have, creating a more complex taste profile.
- → Can I use store-bought pesto and marinara?
Absolutely. High-quality store-bought pesto and marinara work perfectly here, making this a convenient weeknight option without sacrificing flavor.
- → How do I know when the chicken is fully cooked?
Use a meat thermometer to check that the internal temperature reaches 165°F (74°C) in the thickest part of the chicken breast. The cheese should also be melted and bubbly.
- → Can I make this gluten-free?
Yes, simply substitute gluten-free flour and gluten-free breadcrumbs in the breading process. The rest of the ingredients are naturally gluten-free.
- → How long do leftovers keep?
Store leftovers in an airtight container in the refrigerator for up to 3 days. Reheat in the oven at 350°F to maintain the crispy texture.
- → What sides pair well with this dish?
Garlic bread, spaghetti with olive oil and parmesan, or a simple arugula salad with lemon vinaigrette complement the rich flavors beautifully.